GB∕T3001-2017耐火材料常温抗折强度试验方法/Refractory products-Determination of modulus of rupture at ambient temperature
耐火材料 常温抗折强度试验方法
1范围
本标准规定了耐火材料常温抗折强度试验方法的原理、设备、试样、试验步骤、结果计算及试验报告等。
本标准适用于定形和不定形耐火材料。
2规范性引用文件
下列文件对于本文件的应用是必不可少的。凡是注日期的引用文件,仅注日期的版本适用于本文件。凡是不注日期的引用文件,其最新版本(包括所有的修改单)适用于本文。
GB/T 4513.5 不定形耐火材料 第5部分:试样制备和预处理(GB/T 4513.5-2017,ISO 1927-5:2012,MOD)
GB/T 4513.6 不定形耐火材料 第6部分:物理性能的测定(GB/T 4513.6-2017,ISO 1927-6:2012,MOD)
GB/T 7321定形耐火制品试样制备方法
GB/T 8170 数值修约规则与极限数值的表示和判定
GB/T 10325定形耐火制品验收抽样检验规则(GB/T 10325-2012,ISO 5022:1979,NEQ)
3术语和定义
下列术语和定义适用于本文件。
3.1
抗折强度modulus of rupture
具有一定尺寸的耐火材料条形试样,在三点弯曲装置上所能承受的最大应力。
4原理
在常温下,以恒定的加荷速率对试样施加应力直至试样断裂
5 设备
5.1 加荷装置
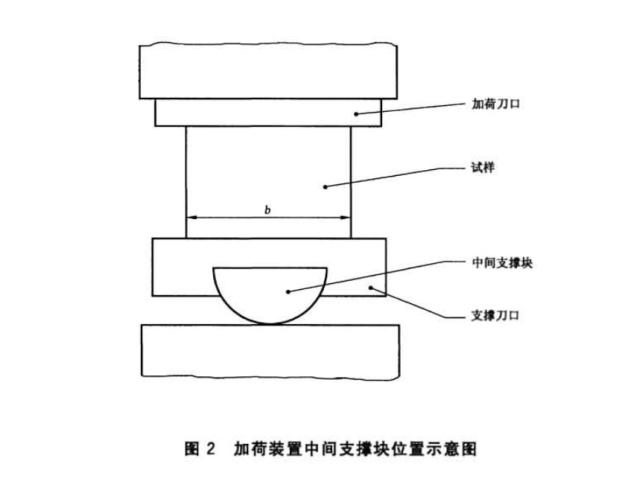
5.1.1 加荷装置应有三个刀口,下面两个刀口支撑试样,上面一个刀口加荷(见图 1)。三个圆柱形刀口的曲率半径应符合表1的规定,刀口长度应比试样的宽度(b)至少大5 mm(见图 2)。三个刀口与试样的接触线应相互平行,且垂直于试样压力面长度方向的侧面。两个下刀口应位于中间支撑块上,中间支撑块的底面是圆柱面的一部分,这样,当试样在垂直面上稍有偏斜时可独立地调节每个下刀口(见图 2)。也可固定一个下刀口,使另一个下刀口和上刀口能在垂直面上调节。两个刀口之间的距离见表1,上刀口位于两个下刀口中间,偏差在 2 mm 内。
5.1.2 加荷装置能够以恒定的速率对准试样中间均匀加荷,并有能记录或指示其断裂载荷的仪器,测力示值误差应在士2%以内。
5.2 电热鼓风干燥箱
能控制在 110 ℃±5 ℃。
5.3游标卡尺
分度值为不大于 0.05 mm。


6试样
6.1数量
6.1.1定形耐火材料样品的数量按 GB/T 10325 的规定或由相关方协商而定。
6.1.2 定形耐火材料的制备按照 GB/T 7321 进行。如果试样从砖上切取,从每块砖上切取的试样数量应相同,以便统计分析。
注:从每块样品上切取的试样数量(详细规定超出了本标准的范围)宜由有关方协商而定并在试验报告中注明。
6.1.3 不定形耐火材料的制备按 GB/T 4513.5 进行,每组试样数量应不少于3个。
6.2 形状和尺寸
6.2.1定形制品标准试样尺寸为230mmX114mmX65(75)mm,也可以采用表1中列出的其他尺寸。
6.2.2如果不能满足表1的特殊试样尺寸,可由相关方协商确定,并在报告中注明。
6.2.3 不定形耐火材料的试样尺寸按照 GB/T 4513.6 相关条款进行。
|
表1定形制品试样尺寸、允许偏差和刀口的规定 单位为毫米 |
|||||
|
试样尺寸 lxbxh |
宽度b和高度h的允许偏差 |
横截面对边之间的平行度允许偏差 |
顶面与底面之间的平行度允许偏差 |
下刀口之间距离 |
上下刀口的曲率 |
|
230X114X75 230X114X65 |
– |
– |
– |
180±1 |
15±0.5 |
|
200X40X40 |
±1 |
±0.15 |
±0.25 |
180±1 |
15±0.5 |
|
150x25x25 |
±1 |
±0.1 |
±0.2 |
125±1 |
5±0.5 |
6.3 试样制备
6.3.1标准砖(见 6.2)可直接做试验。
6.3.2 如果试样从砖上切取,应保留砖成型时加压方向的原砖面作压力面,在试样上注明压力面。注:建议采用连续凸缘金刚石片切割。如果使用齿形凸缘刀片,刀片切出的边缘常出现破损,因此建议刀片进人的面作为张力面。
6.3.3 不定形耐火材料以试样成型时的侧面做压力面。
7试验步骤
7.1 在 110 ℃±5 ℃的干燥箱(5.2)中将试样烘干至恒量,在干燥器中冷却至室温。如果用于化学结合或焦油结合砖,这些制品要进行某种形式的预先热处理。这种预先热处理条件的具体规定超出了本标准的范围,需经相关方协商确定,并在试验报告中注明。
注:对其他不宜 110 ℃±5 ℃烘干的试样,烘干条件宜经有关方面协商确定。
7.2 测量每个试样中间部位的宽度和高度,精确至 0.1 mm,测量下刀口之间距离,精确至 0.5 mm。
7.3将试样对称地放在加荷装置(5.1)的下刀口上。如果试样是整砖,压力面应是成型加压面。如果试样是从砖上切取的,压力面应是原砖的成型加压面。
7.4在常温下对试样垂直施加载荷直至断裂,加荷速率为:
a)致密耐火制品,0.15 MPa/s±0.015 MPa/s;
b) 隔热耐火制品,0.05 MPa/s±0.005 MPa/s.
7.5 记录试样断裂时的载荷(Fmax)。
8 结果计算
8.1 常温抗折强度由式(1)计算:
式中:


σF–常温抗折强度,单位为兆帕(MPa);
Fmax–对试样施加的最大压力,单位为牛顿(N);
LS–下刀口间的距离,单位为毫米(mm);
b–试样宽度,单位为毫米(mm);
h–试样高度,单位为毫米(mm)。
8.2 对于定形制品,如果是整砖,一块砖的测定值就是这块样品的结果。
8.3 对于切取的试样,当从样品上切取的试样为1块时,单值表示这块样品的结果;当从样品上切取的试样大于1块时,用单值和计算的平均值表示这块样品的结果。
8.4 结果按 GB/T 8170 修约,保留一位小数。
9试验报告
试验报告应包括下列内容:
a) 实验室名称;
b)试验项目;
c)试验日期;
d)执行标准,例如“按照 GB/T 3001-2017”;
e)试验砖的标识(制造厂家、品种、砖型、批号);
f)试验样品名称、数量及试样的数量;
g)是否对试样进行过预处理(烘干、热处理温度及保温时间等);
h)试样尺寸;
i)加荷速率(MPa/s);
j)当从每块样品上切取不止一个试样时,报告每块样品中每个试样的抗折强度单值和平均值;当以整砖进行试验时,报告每块样品的抗折强度值。
Refractory products-Determination of modulus of rupture at ambient temperature
1 Range
This standard specifies the principle, equipment, sample, test procedure, result calculation and test report of the bending strength test method of refractories at room temperature.
This standard applies to shaped and amorphous refractories.
2 Normative reference documents
The following documents are essential for the application of this document. For dated references, the date-only version applies to this document. For undated references, the latest version (including all change orders) applies herein.
Amorphous refractories – Part 5: Preparation and pretreatment of specimens (GB/T 4513.5-2017,ISO 1927-5:2012,MOD)
ISO 1927-6:2012, GB/T 4513.6 Amorphous refractories – Part 6: Determination of physical properties (GB/T 4513.6-2017,ISO 1927-6:2012,MOD)
GB/T 7321 shaped refractory product sample preparation method
GB/T 8170 numerical revision rules and limit value representation and judgment
Rules for Sampling Inspection of GB/T 10325 Shaped Refractory Products (GB/T 10325-2012,ISO 5022:1979,NEQ)
3 Terms and definitions
The following terms and definitions apply to this document.
3.1
Modulus of rupture strength
The maximum stress that a strip specimen of a refractory material of a certain size can withstand on a three-point bending device.
4 Principles
At room temperature, stress is applied to the specimen at a constant loading rate until the specimen breaks
5 Devices
5.1 Loading Device
5.1.1 The loading device shall have three knife edges, the lower two knife edges support the sample, and the upper one knife edge is loaded (see Figure 1). The radius of curvature of the three cylindrical knife edges shall comply with the provisions of Table 1, and the length of the knife edges shall be at least 5 mm larger than the width (b) of the sample (see Figure 2). The contact lines between the three knife edges and the sample should be parallel to each other and perpendicular to the side of the pressure surface length direction of the sample. The two lower knife edges should be located on the middle support block, the base of which is part of the cylinder, so that each lower knife edge can be adjusted independently when the sample is slightly skewed in the vertical plane (see Figure 2). A lower cutting edge can also be fixed so that the other lower cutting edge and the upper cutting edge can be adjusted on the vertical plane. The distance between the two knife edges is shown in Table 1. The upper knife edge is located in the middle of the two lower knife edges, and the deviation is within 2 mm.
5.1.2 The loading device can be uniformly loaded in the middle of the sample at a constant rate, and there is an instrument that can record or indicate its breaking load, and the error of the indicating value of the force measurement should be within 2%.
5.2 Electric blast drying oven
It can be controlled at 110 ℃±5 ℃.
5.3 Vernier calipers
The index value is not greater than 0.05mm.


6 samples
6.1 Quantity
6.1.1 The number of shaped refractory samples shall be determined according to GB/T 10325 or as agreed by the parties concerned.
6.1.2 Preparation of shaped refractories shall be carried out in accordance with GB/T 7321. If the sample is cut from a brick, the same number of samples should be cut from each brick for statistical analysis.
Note: The number of samples to be cut from each sample (details of which are beyond the scope of this standard) should be agreed upon by the parties concerned and indicated in the test report.
6.1.3 The preparation of amorphous refractories shall be carried out according to GB/T 4513.5, and the number of samples in each group shall be no less than 3.
6.2 Shape and size
6.2.1 The standard sample size is 230mmX114mmX65(75)mm. Other sizes listed in Table 1 May also be used.
6.2.2 If the special sample size specified in Table 1 cannot be met, it may be determined by the parties concerned and indicated in the report.
6.2.3 The sample size of amorphous refractories shall be carried out in accordance with the relevant provisions of GB/T 4513.6.
|
Table 1 Requirements for sample size, allowable deviation and cutting edge of shaped products Unit in millimeter |
|||||
|
Sample size lxbxh |
Allowable deviation of width b and height h |
Allowable deviation of parallelism between opposite sides of cross section |
Allowable deviation of parallelism between top and bottom surfaces |
Distance between the lower edges Ls |
The radius of curvature of the upper and lower edges |
|
230X114X75 230X114X65 |
– |
– |
– |
180±1 |
15±0.5 |
|
200X40X40 |
±1 |
±0.15 |
±0.25 |
180±1 |
15±0.5 |
|
150x25x25 |
±1 |
±0.1 |
±0.2 |
125±1 |
5±0.5 |
6.3 Sample Preparation
6.3.1 Standard bricks (see 6.2) can be tested directly.
6.3.2 If the sample is cut from the brick, the original brick surface in the pressure direction of the brick molding shall be retained as the pressure surface, and the pressure surface shall be indicated on the sample.
Note: Continuous flanged diamond is recommended for cutting. If a toothed flange blade is used, the cut edge of the blade is often damaged, so it is recommended that the surface of the blade into the person be used as the tension surface.
6.3.3 The pressure surface of the amorphous refractory shall be the side of the specimen when it is formed.
7 Test Procedure
7.1 Dry the sample to a constant quantity in a drying box (5.2) at 110°C ±5°C, and cool it to room temperature in the dryer. If used in chemically bonded or tar-bonded bricks, these products are subjected to some form of pre-heat treatment. The specific provisions of such pre-heat treatment conditions are beyond the scope of this standard and need to be determined by the relevant parties through consultation and indicated in the test report.
Note: For other samples that are not suitable for drying at 110°C ±5°C, the drying conditions should be determined through consultation with the relevant parties.
7.2 Measure the width and height of the middle part of each sample to the accuracy of 0.1 mm, and measure the distance between the lower knife edges to the accuracy of 0.5 mm.
7.3 Place the sample symmetrically on the lower knife edge of the loading device (5.1). If the sample is a whole brick, the pressure surface should be the molded pressure surface. If the sample is cut from the brick, the pressure surface should be the molded pressure surface of the original brick.
7.4 Apply vertical load to the sample at normal temperature until it breaks, and the loading rate is as follows:
a) Dense refractory products, 0.15MPa /s± 0.015MPa /s;
b) Heat insulation refractory products, 0.05MPa /s± 0.005MPa /s.
7.5 Record the load (Fmax) at fracture of the sample.
8 Result Calculation
8.1 Flexural strength at room temperature is calculated by equation (1) :
Formula:


σF– flexure strength at room temperature, in MPa;
Fmax– maximum pressure applied to the specimen in Newtons (N);
LS– the distance between the lower edges, in millimeters (mm);
b– specimen width, in millimetres (mm);
h– sample height, in millimetres (mm).
8.2 For shaped products, in the case of whole bricks, the measured value of one brick is the result of that sample.
8.3 For the sample cut, when the sample cut from the sample is 1, the single value represents the result of this sample; When more than 1 sample is cut from the sample, the result of this sample is represented by the single value and the calculated average value.
8.4 The result is modified according to GB/T 8170, with one decimal place reserved.
9 Test Report
The test report shall include the following:
a) Laboratory name;
b) Test items;
c) Test date;
d) Implementation standards, such as “in accordance with GB/T 3001-2017”;
e) Identification of test bricks (manufacturer, variety, brick type, batch number);
f) Name, quantity and number of test samples;
g) whether the sample is pre-treated (drying, heat treatment temperature and holding time, etc.);
h) sample size;
i) Loading rate (MPa/s);
j) When more than one sample is cut from each sample, report the single value and average value of the flexural strength of each sample in each sample; When testing with whole bricks, the flexural strength value of each sample is reported.


