GB/T 37796-2019 隔热耐火材料 导热系数试验方法(量热计法)/Insulation refractories-Determination of thermal conductivity(calorimeter)
隔热耐火材料 导热系数试验方法(量热计法)
1范围
本标准规定了隔热耐火材料导热系数试验方法(量热计法)的原理,设备、试样制备,试验步骤、结果计算和试验报告。
本标准适用于耐火纤维及其制品、隔热定形制品等隔热耐火材料导热系数的测定。
2规范性引用文件
下列文件对于本文件的应用是必不可少的。凡是注日期的引用文件,仅注日期的版本适用于本文件。凡是不注日期的引用文件,其最新版本(包括所有的修改单)适用于本文件。
GB/T2998 定形隔热耐火制品体积密度和真气孔率试验方法
GB/T8170 数值修约规则与极限数值的表示和判定
GB/T 16839.1 热电偶 第1部分:电动势规范和允差
GB/T 17911 耐火纤维制品试验方法
3原理
根据傅里叶导热定律,当测试样品传热达到稳态时,单位时间内通过试样热面传递至冷面后被量热计吸收的热量,与试样垂直于热量传播方向的截面面积和温度梯度成正比。本标准测试时需要较大的温度梯度和稳态条件。
4仪器设备
4.1电热干燥箱
能控制温度在110℃±5℃。
4.2天平
分度值0.1g。
4.3导热系数测定仪
4.3.1导热系数测定仪包括加热室、量热计、水循环系统,热电偶及仪表。导热系数测定仪结构示意图见图1。
4.3.2加热室:见图2,在中性或氧化性气氛中加热室可按照一定升温曲线加热到并能稳定在1550℃±3 ℃。一块不小于342 mmx228 mmx25 mm 碳化硅均热板置于试样上方,碳化硅板342 mmx228 mm的面应平整。在量热计下,应设置一层至少25 mm厚的隔热层。
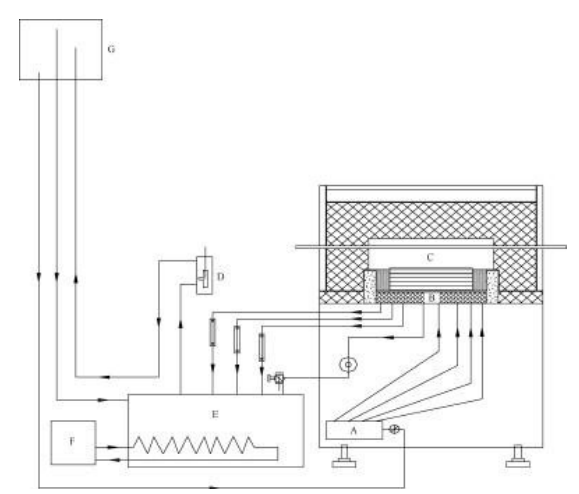
说明:
A-分水器; E–下水箱;
B-量热计; F–制冷系统;
C–加热室; G–上水箱
D–水泵;
图1导热系数测定仪结构示意图

说明:
A–保护砖; C–测试砖;
B–均热板; D–隔热层
图2加热室剖面图
4.3.3量热计:由金属铜按照图3加工而成,量热计进水和出水通道布局应是依次相邻。量热计为76 mmX76 mm的正方形,有一个人水管接头和一个出水管接头。围绕着量热计有一个 342 mmX228 mm的内防护套,具有两个人水管接头和两个出水管接头。外层护套从内层护套向侧面延伸51mm,垂直延伸至加热室底部(见图 3)。量热计与内层护套应间隔 0.8 mm。
4.3.4水循环系统:水循环系统供给量热计的水应恒压和恒温。进水静水压应不小于29.9kPa,进水水温应尽可能等于室温,温差在-1℃至+3℃之间,温度变化率不应超过0.5℃/h。通过调节阀稳定量热计进出水量,试验期间变化不超过±1%。
4.3.5测定试样温度的热电偶及仪表:根据测量需要选用合适的K型或S型热电偶,且满足GB/T 16839.1的要求:用误差不大于±0,05 mV的电位差计来测定热电偶的电动势。
4.3.6 测定量热计中水温升高的热电偶及仪表:应采用一种多对示差热电偶测量量热计的水温升高其精度不低于流经量热计水温升高值的1%。热电偶至少要插入人口水管和出口水管内 89 mm,接点离量热计底部的距离不大于6 mm。测量 10 对铜-康铜示差热电偶电动势时的电位计量程为0mV~2mV,仪表误差不大于±0.0lmV.
4.3.7测定量热计和内防护套之间温差的热电偶及仪表:经校正的 10 对铜-康铜示差热电偶放置在量热计和内防护套内,用于测量量热计和内防护套之间温差。试验期间,此温差不大于±0.03℃。测量热电偶电动势的电位计量程为0mV~2mV,仪表误差不大于±0.01mV。
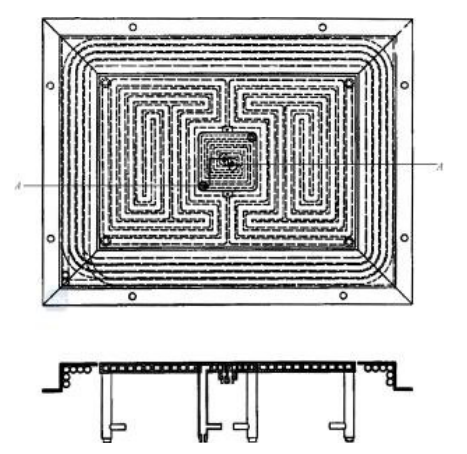
A-A剖面图
图3量热计和保护套结构示意图
5试样制备
5.1定形隔热砖
试样由3块 228 mmX114 mmX64 mm的A型直形砖和6块228 mmX57 mmX64 mm的B型条形砖组成,3 块 A 型直形砖 228 mmX114 mm的面和B型条形砖 228 mmX57 mm 的面要磨平并平行,厚度差不大于±0.3 mm。试样厚度可根据实际厚度调整,但不应超过76 mm或低于51 mm。彼此接触的侧面要磨平并与 A型直形砖228 mmX114 mm 的面和B型条形砖228 mmx57 mm的面垂直。
5.2耐火纤维及制品
试样切制成456 mmX342 mm大小的毯或板,试样可由多层样品组成,但总厚度不超过76 mm。因碳化硅均热板重力作用而使测量样品改变体积密度的样品,可在对角线近角1/4位置打4个孔,用于放置陶瓷支柱支撑碳化硅板,或用不改变试样体积密度的其他方法。
6试验步骤
6.1测试试样的厚度及体积密度。试样应在110℃±5℃下干燥,定形隔热制品的厚度和体积密度的测定按照GB/T 2998进行;耐火纤维及制品的厚度和体积密度的测定按照 GB/T 17911进行。
6.2安装试样。定形隔热砖按照图4所示,将试样铺排于加热室内,耐火纤维及制品将试样直接平铺于加热室内。

说明:
A型直形砖;
B型条形砖。
图4 装样示意图
6.3安装试样测温热电偶。定形隔热砖的测温热电偶放置在中间 A 型直型砖的正中心位置,冷面中心位置和热面中心位置分别放置一只测温热电偶;耐火纤维及制品类的测温热电偶按置在试样对角线中心位置,冷面和热面分别放置一只热电偶。若用于测试多层试样,另应在每个试样层与层接触面的中心位置放置一只热电偶。
6.4安装碳化硅均热板。碳化硅均热板应置于中心3块A型直型砖 228 mmx342 mm的面上。试样热面与碳化硅均热板的间隙应不低于25 mm,可以用隔热砖切成小块垫在均热板的四角。耐火纤维及制品类可用陶瓷块置人打孔位置以将均热板支撑到底部。
6.5关闭加热室,开启供水阀,并给加热装置供电,按5℃/min~10 ℃/min 的速率升温。流经量热计水的流量应保持在80g/min~150g/min之间,采用称量法测定流量时,在规定的时间内收集到的水的质量应不少于200 g,精确到±0.1g。流量应恒定,在试验期间其偏差应在±1%之内。炉温超过800℃时,炉内应保持中性或氧化气氛,不应有可燃物。
6.6在测试期间,应让试样达到热流稳定状态。量热计的热流在2h内的变化率小于2%,量热计和内防护套之间的温差不大于0.03℃,试样热面的温度变化不大于±3℃,进入量热计的水温变化不大于0.5℃/h。通常,当热面温度发生一定变化之后使设备温度达到平衡需3h或更长时间。注:如果任一上述条件超过规定的公差会引起明显的误差。
6.7热流达到稳定状态之后,测定试样的冷热面温度、流经量热计水的流量以及量热计出水和进水的温度的升高值。在2h内,每间隔30min测量一组数据,至少取4组,各项值的平均值用来计算对应温度下的导热系数的计算。
7、结果计算
用式(1)计算导热系数,计算结果按 GB/T 8170 修约,保留小数点后三位。
![]()
式中:
k–导热系数,单位为瓦特每米开尔文[W/(m·K)];安
q–单位时间流入量热计的热量(量热计单位时间流过水的质量乘以水的温升和比热),单位为瓦特(W);
L–厚度(热电偶焊点之间的距离,在该部位测t1和t2,单位为米(m):
t1–试样热面温度,单位为开尔文(K);
t2:–试样冷面温度,单位为开尔文(K);
A –中心量热器面积,单位为平方米(m’)。
8试验报告
试验报告应包含以下内容:
a)试样名称及牌号;
b)委托单位;
c)试验标准;
d)试样的厚度和体积密度;
e)试验前后试样暴露在加热室温度下所引起状态的变化;
f)试验条件和结果;
g)需要时用测得的导热系数对应平均温度作曲线
Insulation refractories-Determination of thermal conductivity(Calorimeter)
1 Range
This standard specifies the principle, equipment, sample preparation, test steps, calculation of results and test report of the thermal conductivity test method of thermal insulation refractories (calorimeter method).
This standard is applicable to the determination of thermal conductivity of refractory materials such as refractory fiber and its products, heat insulation shaped products, etc.
2 Normative reference documents
The following documents are essential for the application of this document. For dated references, the date-only version applies to this document. For undated references, the latest version (including all amendment orders) applies to this document.
Test method for bulk density and true porosity of GB/T2998 shaped heat-insulating refractory products
GB/T8170 value revision rules and limit value representation and judgment
GB/T 16839.1 Thermocouples – Part 1: electromotive force specifications and tolerances
GB/T 17911 refractory fiber products test method
3Principles
According to Fourier’s law of thermal conductivity, when the heat transfer of the test sample reaches a steady state, the heat absorbed by the calorimeter after being transferred from the hot side to the cold side of the sample in unit time is proportional to the cross section area and temperature gradient of the sample perpendicular to the direction of heat propagation. This standard requires large temperature gradients and steady-state conditions for testing.
4 Instruments and Equipment
4.1 Electric drying oven
The temperature can be controlled at 110℃±5℃.
4.2 Balance
Index value 0.1g.
4.3 Thermal conductivity tester
4.3.1 Thermal conductivity tester includes heating chamber, calorimeter, water circulation system, thermocouple and instrument. The structure diagram of the thermal conductivity tester is shown in Figure 1.
4.3.2 Heating chamber: As shown in Figure 2, the heating chamber can be heated to 1550℃±3 ℃ according to a certain temperature curve in a neutral or oxidizing atmosphere. A silicon carbide soaking plate not less than 342 mmx228 mmx25 mm is placed above the sample, and the surface of the silicon carbide plate 342 mmx228 mm should be flat. Under the calorimeter, a layer of insulation at least 25 mm thick should be provided.

Instructions:
A– water distributor; E– lower water tank;
B– calorimeter; F– refrigeration system;
C– heating chamber; G– Water tank
D– water pump;
FIG. 1 Structure diagram of thermal conductivity tester
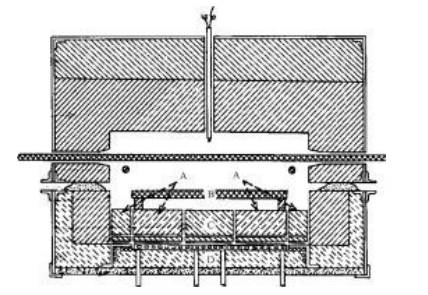
Instructions:
A– protective brick; C- Test brick;
B– soaking plate; D– insulation
Figure 2 Heating chamber profile
4.3.3 Calorimeter: The calorimeter is made of copper according to Figure 3. The inlet and outlet channels of the calorimeter should be adjacent in turn. The calorimeter is 76 mmX76 mm square with a human pipe connector and an outlet pipe connector. Around the calorimeter there is an inner protective sheath of 342 mmX228 mm, with two personal water pipe fittings and two outlet water pipe fittings. The outer sheath extends 51mm laterally from the inner sheath to the bottom of the heating chamber vertically (see Figure 3). The calorimeter should be 0.8mm apart from the inner sheath.
4.3.4 Water circulation system: The water supplied to the calorimeter by the water circulation system should be at constant pressure and constant temperature. The inlet hydrostatic pressure should not be less than 29.9kPa, the inlet water temperature should be equal to room temperature as much as possible, the temperature difference between -1℃ and +3℃, and the temperature change rate should not exceed 0.5℃/h. The amount of water in and out of the calorimeter is stabilized through the regulating valve, and the change during the test does not exceed ±1%.
4.3.5 Thermocouple and instrument for measuring sample temperature: Select a suitable K or S thermocouple according to the measurement needs, and meet the requirements of GB/T 16839.1: use a potential difference meter with an error of not more than ±0,05 mV to determine the electromotive force of the thermocouple.
4.3.6 Determination of thermocouples and instruments in which the water temperature rises in the calorimeter: A multi-pair differential thermocouple shall be used to measure the water temperature rise of the calorimeter with an accuracy not less than 1% of the water temperature rise value flowing through the calorimeter. The thermocouple should be inserted at least 89 mm into the population pipe and outlet pipe, and the distance between the contact and the bottom of the calorimeter should not be greater than 6 mm. When measuring the electromotive force of 10 pairs of copper-Constantine differential thermocouples, the measuring range of the potentiometer is 0mV~2mV, and the instrument error is not more than ±0.0lmV.
4.3.7 Thermocouples and meters for measuring the temperature difference between the calorimeter and the inner protective sheath: 10 pairs of corrected copper-Constantam differential thermocouples are placed in the calorimeter and the inner protective sheath for measuring the temperature difference between the calorimeter and the inner protective sheath. During the test, the temperature difference is not greater than ±0.03℃. Measuring the electromotive force of thermocouple potentiometer range is 0mV~2mV, instrument error is not more than ±0.01mV.

A-A profile
FIG. 3 Structure diagram of calorimeter and protective sleeve
5 Sample preparation
5.1 Shaped heat insulation brick
The sample consists of three 228 mmX114 mmX64 mm A-shaped straight bricks and six 228 mmX57 mmX64 mm B-shaped bar bricks, three 228 mmX114 mm A-shaped straight bricks and 228 mmX57 mm B-shaped bar bricks The surface should be smooth and parallel, and the thickness difference is not more than ± 0.3mm. Sample thickness can be adjusted according to the actual thickness, but should not exceed 76 mm or less than 51 mm. The sides in contact with each other shall be ground flat and perpendicular to the face of the A straight brick 228 mmX114 mm and the face of the B bar brick 228 mmx57 mm.
5.2 Refractory fibers and products
The sample is cut into a blanket or plate in the size of 456 mmX342 mm. The sample may consist of multiple layers of samples, but the total thickness does not exceed 76 mm. For samples that change the bulk density of the measured sample due to the gravity action of the silicon carbide thermal plate, 4 holes can be drilled at the position of 1/4 of the diagonal near Angle for placing ceramic pillars to support the silicon carbide plate, or other methods that do not change the bulk density of the sample.
6 Test Procedure
6.1 Test the thickness and bulk density of the sample. The sample should be dried at 110C±5°C, and the thickness and bulk density of the shaped thermal insulation product should be determined according to GB/T 2998; The thickness and bulk density of refractory fibers and products are determined in accordance with GB/T 17911.
6.2 Installing the sample. The sample is laid out in the heating chamber by the shaped heat insulation brick as shown in Figure 4, and the sample is directly laid in the heating chamber by the refractory fiber and products.
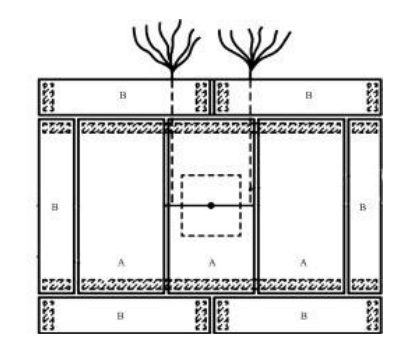
Instructions:
A-A type straight brick;
B-B strip brick.
Figure 4 Schematic diagram of loading sample
6.3 Install the sample thermocouple. The temperature measuring thermocouple of the shaped heat insulation brick is placed in the central position of the middle A straight brick, and a temperature measuring thermocouple is placed in the central position of the cold surface and the central position of the hot surface. Temperature measuring thermocouples of refractory fibers and products are placed in the center of the diagonal of the sample, and a thermocouple is placed on the cold side and the hot side respectively. For testing multilayer samples, a thermocouple should also be placed in the center of the contact surface between each sample layer and the layer.
6.4 Installing a silicon carbide soaking Plate. The silicon carbide soaking plate shall be placed on the surface of 228 mmx342 mm of the central three A-type straight bricks. The gap between the hot surface of the sample and the silicon carbide soaking plate should not be less than 25 mm, and the heat insulation brick can be cut into small pieces and placed on the four corners of the soaking plate. Refractory fibers and products can be placed in the perforated position of ceramic blocks to support the soaking plate to the bottom.
6.5 Close the heating chamber, open the water supply valve, and supply power to the heating device, and heat up at the rate of 5℃/min to 10 ℃/min. The flow of water flowing through the calorimeter should be maintained between 80g/min and 150g/min, and when the flow is measured by weighing method, the mass of water collected within the specified time should be no less than 200g, accurate to ±0.1g. The flow rate should be constant and its deviation should be within ±1% during the test. When the furnace temperature exceeds 800 ° C, the furnace should maintain a neutral or oxidizing atmosphere, and there should be no combustible materials.
6.6 During the test, the sample should be allowed to reach a stable state of heat flow. The change rate of the heat flow of the calorimeter within 2h is less than 2%, the temperature difference between the calorimeter and the inner protective sleeve is not more than 0.03℃, the temperature change of the hot surface of the sample is not more than ±3℃, and the change of the water temperature entering the calorimeter is not more than 0.5℃/h. Usually, it takes 3h or longer for the temperature of the equipment to reach equilibrium after a certain change in the temperature of the hot surface. Note: If any of the above conditions exceed the specified tolerances, significant errors will be caused.
6.7 After the heat flow reaches a stable state, the temperature of the cold and hot surface of the sample, the flow of water through the calorimeter and the temperature rise of the outlet and inlet of the calorimeter are measured. Within 2h, a set of data should be measured every 30min and at least 4 sets should be taken. The average value of each value is used to calculate the thermal conductivity at the corresponding temperature.
7.Result calculation
Formula (1) is used to calculate the thermal conductivity, and the calculation result is revised according to GB/T 8170, with three decimal places reserved.
![]()
Formula:
k- Thermal conductivity, in watts per meter Kelvin [W/(m·K)]; Ann
q– the heat of the unit time inflow calorimeter (the mass of the water flowing through the unit time of the calorimeter multiplied by the temperature rise and specific heat of the water), in watts (W);
L– Thickness (distance between thermocouple solder joints, measured at t1 and t2 in meters (m):t1— sample hot surface temperature, unit is Kelvin (K);
t2:– cold surface temperature of the sample, expressed in Kelvin (K);
A — Area of the central calorimeter, in square meters (m’).
8 Test report
The test report shall contain the following:
a) Name and grade of the sample;
b) the entrusting unit;
c) Test standards;
d) thickness and bulk density of the sample;
e) Changes in the state caused by exposure of the sample to the temperature of the heating chamber before and after the test;
f) test conditions and results;
g) If necessary, use the measured thermal conductivity corresponding to the average temperature as a curve

