
YB/ T 5202.1-2003 不定形耐火材料试样制备方法 第1部分 耐火浇注料/ Preparation of specimen for unshaped refractoriesPart 1:Refractory castables
不定形耐火材料试样制备方法 第1部分 耐火浇注料
1范围
本部分规定了致密和隔热耐火浇注料流动性的定义及测试方法,以及试样制备的成型设备、成型方法、养护和烘干条件。
本部分适用于致密和隔热耐火浇注料的流动值测定和试样制备。
2 规范性引用文件
下列文件中的条款通过本部分的引用而成为本部分的条款。凡是注日期的引用文件,其随后所有的修改单(不包括勘误的内容)或修订版均不适用于本部分,然而,鼓励根据本部分达成协议的各方研究是否可使用这些文件的最新版本。凡是不注日期的引用文件,其最新版本适用于本部分。
GB/T 17617-1998 耐火原料和不定形耐火材料 取样
3 术语和定义
本部分采用下列术语和定义
3.1
流动性 fowability
耐火浇注料加水或其他液体结合剂并搅拌均匀后,在自重(和/或)外力作用下流动性能的度量。以振动流动值 Dt: 表示:
Dt=(D-100)/100×100%(1)
式中:
Dt:–流动值,%;
D–浇注料在自重(和/或)外力作用下平均铺展的直径,单位为毫米(mm)。
3.2
养护cure
耐火浇注料成型后,在规定的温度和湿度条件下保存一定时间以获得强度的过程
4原理
4.1流动性试验
耐火浇注料在加人不同量的水或其他液体结合剂并搅拌均匀后,在振动台上装人锥形模中,移去锥形模,在一定的时间内和规定的率、振幅的作用下,测定其平均铺展直径。
4.2 试样制备
耐火浇注料中加人按流动性试验确定的加水(或其他液体结合剂)量,在搅拌机中经过一定的时间搅拌均匀后,在规定的条件下成型、养护和烘干。
5 实验室和设备
5.1 实验室 实验室的温度应保持在 15℃~25℃,相对湿度不低于50%。
5.2 试样养护箱 养护箱应能保持相对湿度不小于90%,温度 20℃±1℃。
5.3 搅拌机 搅拌机的工作原理如图1所示。搅拌桶和搅拌叶片应有足够的强度。
5.3.1搅拌桶 容量5L~101,主要用于流动值测定;容量 10L~301,主要用于试样制备。
5.3.2 搅拌叶片 叶片的形状应与搅拌桶的内部形状和尺寸相配合。搅拌叶片能绕A轴(搅拌桶的对称轴)公转,同时绕 B轴(搅拌叶片的对称轴)反向自转,转速分别为:
|
自转(r/min) |
公转(r/min) |
|
|
I档(慢速) |
120±5 |
40±5 |
|
Ⅱ档(中速) |
230±10 |
70±10 |
|
Ⅲ档(快速) |
420±10 |
130±10 |
|
搅拌桶应能升降以调整叶片与搅拌桶之间的间隙。 |
||
5.4 振动台 台面必须保持水平,只能作单轴垂直方向振动,振动频率 50 Hz,振幅 0.75 mm±0.05 mm。用于测定流动值时,台面应光洁。
5.5 台秤 25 kg,精度 10 g;5 kg,精度1 g。
5.6 天平 1 000 g,精度 0.1 g。
5.7 量筒 500 mL,精度10 mL;100 mL,精度1mL。
5.4 振动台 台面必须保持水平,只能作单轴垂直方向振动,振动频率 50 Hz,振幅 0.75 mm±0.05 mm。用于测定流动值时,台面应光洁。
5.5 台秤 25 kg,精度 10 g;5 kg,精度1 g.
5.6 天平 1 000 g,精度 0.1 g。
5.7 筒 500 mL,精度 10 mL;100 mL,精度1 mL

图1 搅拌机工作原理示意图
5.8 锥形模 上口内直径为 70 mm,下口内直径为 100 mm,高为 60 mm。5.9 直尺 长度 30 cm,刻度1 mm。
5.10 游标卡尺 长度 300 mm。
5.11 秒表。
5.12 模具。
5.13 镘刀。
5.14 捣固棒。
5.15 烘箱。
5.16 干燥器
5.17 料铲。
6 抽样
6.1 样品的抽取
样品的抽取按 GB/T 17617-1998 进行。
6.2 样品缩分
将样品充分混合,若几种组分分别包装,则每种组分先各自混合均匀,再按比例称取,一起混合均匀,然后用四分法分成两份。一份作为试验室样品,进行检验。另一份作为副样,保存时间一般不超过1 个月。
6.3 化学分析试样和耐火度试样
从试验室样品中按四分法缩分抽取,在规定的条件下粉碎、研磨,制备化学分析试样和耐火度试样。
特殊情况下,可以采用常温耐压强度压碎后的残样制取,并在检验报告中注明。
7 试样规格
根据不同的检测项目应制备不同尺寸的试样,试样尺寸见表 1。
|
表1用于不同检测项目的试样规格 |
||
|
试样型号 |
试样尺寸/mm |
检测项目 |
|
A型 |
230X114x65 |
抗热震性、导热系数 |
|
B型 |
160X40x40 |
耐压强度、抗折强度、加热永久线变化、显气孔率、体积密度、热膨胀 |
|
C型 |
ф(160~180)X(20~25) |
导热系数 |
|
D型 |
ф50×50 |
荷重软化温度 |
|
E型 |
ф(20~25)x100 20x20x100 |
热膨胀 |
|
F型 |
100x100x30 |
耐磨性 |
|
G型 |
50x50x50 |
抗爆裂性 |
|
对于临界粒度大于8mm的试验料,建议制备A型试样,然后切制成相应的规格尺寸。 |
||
8 流动性试验
8.1 试验料的制备
8.1.1 从混合均匀的试验室样品中准确称取足够做两次流动值测定的试验料,放进搅拌桶内。8.1.2 用量筒量取搅拌用水,水温应接近室温,准确到1ml。第一次可按与同类产品相当的加水量,再次测定时酌情增减用水量,每次增减量不大于试验料干重的 0.5%。其他液体结合剂用称量法。8.1.3 将试验料慢速干混1 min,然后快速搅拌,边搅拌边加人水或其他液体结合剂,2 min后稍停,清理粘附在搅拌叶片和桶壁的泥料,再次搅拌 2 min,总搅拌时间为 5 min。8.2 流动值测定
8.2.1 将锥形模放在振动台上,先加人试验料至锥形模深度的 2/3,用捣棒捣实,再继续加入剩余料,并捣实抹平。
8.2.2 取下锥形模,启动振动台,振动 15 s。
8.2.3用游标卡尺每间隔 45°测量试验料四个直径的数值,取其平均值,精确到1 mm。8.2.4 按 8.2.1~8.2.3步骤重复测定两次,取两次的平均值作为流动值结果,记录试验料的用水量和流动值。每次测定不得用已经振动过的料,试样料的制备和两次测定应在 10 min 内完成。8.2.5 自流浇注料加料时无捣实,加满料后无需振动,取下锥形模后停留1 min,按 8.2.3~8.2.4测定流动值。
8.3 加水(或其他液体结合剂)量的确定
用不同加水量的试验料分别进行流动性测定,当流动值达到 60%~90%时,即为合适用水量,并作为试样成型时的用水量。
9 试样成型
9.1 从混合均匀的试验料中,称取成型试样所需用的量,加人按 8.3所确定的用水(或其他液体结合剂)量。
9.2 按 8.1.3 制备试验料。
9.3 将试模固定在振动台上,填装试验料直至试模上边缘,启动振动台,边振动边填装试验料。9.4 停止振动,用镘刀去除高出试模边缘的试验料,并将试样表面抹平。对于致密浇注料,全部振动时间一般为 60 s~90 s;对于隔热浇注料,全部振动时间一般为 30s~60s。从加水开始到试样成型的全部时间不超过 10 min。
9.5 自流浇注料试样的成型,直接将搅拌均匀的试验料填装到试模中,停留 2 min 后用镘刀抹平9.6 当委托方提供试样制备和养护方法时,以委托方提供的方法为准,并在检验报告中注明。
10 试样养护10.1 气硬性耐火浇注料 试样带模置于实验室环境中养护 24h脱模,在相同条件下再存放 24 h。10.2 水硬性耐火浇注料试样 带模置于相对湿度不小于 90%,温度 20℃士1℃的养护箱中,养护 24 h后脱模,再在相同条件下养护24 h。
10.3 热硬性耐火浇注料 试样带模置于 40℃~110℃烘箱中烘干 12 h,脱模后再在相同条件下烘干24 h。
11 试样烘于
对需要测定线变化率的试样,在养护后脱模,立即测量尺寸。随后放入烘箱中逐渐升温至 110℃士5℃,在110℃士5℃或规定的条件下干燥 24 h。
干燥后试样随烘箱冷却至室温。冷却后试样应存放于干燥器中,存放时间不应超过3天。
12 试验报告
试验报告应包括以下内容:
a)委托单位;
b)试样名称;
c)实验室温度和相对湿度;试验用结合剂量及流动值;
d)振动时间和搅拌时间;
e)养护条件;试验单位;
f)试验人员;
g)试验日期。
Preparation of specimen for unshaped refractoriesPart 1:Refractory castables
1 Range
This part specifies the definition and test method of fluidity of dense and insulated refractory castables, as well as the molding equipment, molding method, curing and drying conditions for sample preparation.
This part is applicable to the flow value determination and sample preparation of dense and insulated refractory castables.
2 Normative reference documents
The terms in the following documents become terms of this part by reference to this part. All subsequent amendments (excluding errata) or revisions to dated references shall not apply to this part; however, parties to an agreement under this part are encouraged to examine the availability of the most recent version of these documents. For undated references, the latest version applies to this section.
GB/T 17617-1998 Sampling of refractory raw materials and amorphous refractory materials
3 Terms and definitions
The following terms and definitions are used in this section
3.1
Fowability
A measure of the ability of a refractory castable to flow under self-weight (and/or) external force when water or other liquid binder is added and stirred evenly. Expressed by the vibration flow value Dt:
Dt=(D-100)/100×100%(1)
Formula:
Dt:– Flow value,%;
D- The average spread diameter of the castable under its own weight (and/or) external force, in millimetres (mm).
3.2
Curing
After the refractory castable is formed, it is stored for a certain time under specified temperature and humidity conditions to obtain strength
4 Principles
4.1 Fluidity test
After adding different amounts of water or other liquid binder and stirring evenly, the refractory castable is installed in the conical mold on the shaking table, the conical mold is removed, and its average spreading diameter is measured within a certain time and under the action of the specified rate and amplitude.
4.2 Sample Preparation
The amount of water (or other liquid binder) determined by the fluidity test is added to the refractory castable, and after a certain period of time in the mixer, it is formed, maintained and dried under specified conditions.
5 Laboratory and equipment
5.1 Laboratory The temperature of the laboratory should be maintained at 15℃~25℃, and the relative humidity should not be less than 50%.
5.2 Specimen curing box The curing box should be able to maintain the relative humidity of not less than 90% and the temperature of 20℃±1℃.
5.3 Mixer The working principle of the mixer is shown in Figure 1. Mixing bucket and mixing blade should have sufficient strength.
5.3.1 Mixing tank capacity 5L~101, mainly used for flow value measurement; Capacity 10L~301, mainly used for sample preparation.
5.3.2 Mixing blades The shape of the blades shall match the internal shape and size of the mixing drum. The stirring blade can rotate around axis A (the symmetry axis of the stirring bucket), while the reverse rotation around axis B (the symmetry axis of the stirring blade), the speed is:
|
Autorotation(r/min) |
Revolution(r/min) |
|
|
I gear (slow) |
120±5 |
40±5 |
|
Second gear (medium speed) |
230±10 |
70±10 |
|
Third gear (fast) |
420±10 |
130±10 |
|
The stirring bucket shall be able to be raised and lowered to adjust the clearance between the blades and the stirring bucket. |
||
5.4 The table surface must be kept horizontal and can only be vibrated in the vertical direction of a single axis, with a vibration frequency of 50 Hz and an amplitude of 0.75mm ± 0.05mm. When used to determine the flow value, the table should be smooth.
5.5 scale 25 kg, accuracy 10 g; 5 kg, accuracy 1 g.
5.6 Balance 1 000 g, accuracy 0.1g.
5.7 Measuring cylinder 500 mL, accuracy 10 mL; 100 mL, accuracy 1mL.
5.4 The table surface must be kept horizontal and can only be vibrated in the vertical direction of a single axis with a vibration frequency of 50 Hz and an amplitude of 0.75mm to 0.05mm. When used to determine the flow value, the table should be smooth.
5.5 scale 25 kg, accuracy 10 g; 5 kg, accuracy 1 g.
5.6 Balance 1 000 g, accuracy 0.1g.
5.7 cylinder 500 mL, accuracy 10 mL; 100 mL, accuracy 1 mL
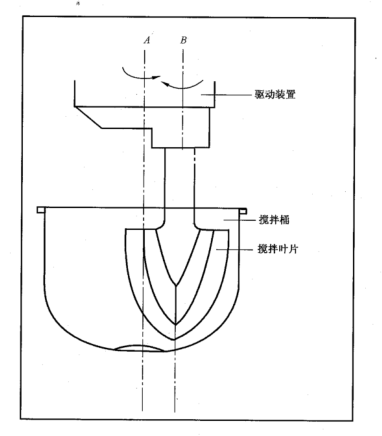
FIG. 1 Schematic diagram of working principle of mixer
5.8 The inner diameter of the upper mouth of the conical die is 70 mm, the inner diameter of the lower mouth is 100 mm, and the height is 60 mm. 5.9 Length of ruler 30 cm, scale 1 mm.
5.9 Length of ruler 30 cm, scale 1 mm.
5.10 Length of vernier caliper 300 mm.
5.11 Stopwatch.
5.12 Mold.
5.13 Trowel.
5.14 Tamping rod.
5.15 Oven.
5.16 Dryer
5.17 Material shovel.
6 Sampling
6.1 Sample extraction
Samples were drawn according to GB/T 17617-1998.
6.2 Sample reduction
The sample is fully mixed, if several components are packaged separately, each component is mixed evenly first, then weighed proportionally, mixed evenly together, and then divided into two quarters. One will be used as a laboratory sample for testing. The other copy as a secondary sample, the storage time is generally not more than 1 month.
6.3 Chemical analysis samples and refractoriness samples
The chemical analysis sample and the refractoriness sample are prepared by crushing and grinding under the specified conditions.
In special cases, the residual sample after crushing at room temperature can be prepared and indicated in the inspection report.
7 Sample Specifications
Samples of different sizes should be prepared according to different test items. The sample sizes are shown in Table 1.
|
Table 1 Sample specifications for different test items |
||
|
Sample type |
Sample size/mm |
Test item |
|
TypeA |
230X114x65 |
Thermal shock resistance, thermal conductivity |
|
TypeB |
160X40x40 |
Compressive strength, flexural strength, heating permanent line change, apparent porosity, bulk density, thermal expansion |
|
TypeC |
ф(160~180)X(20~25) |
Thermal conductivity |
|
TypeD |
ф50×50 |
Softening temperature under load |
|
TypeE |
ф(20~25)x100 20x20x100 |
Thermal expansion |
|
TypeF |
100x100x30 |
Abrasion resistance |
|
Type G |
50x50x50 |
Resistance to bursting |
|
For the test material with A critical particle size greater than 8mm, it is recommended to prepare the A-type sample and then cut it into the corresponding specification size. |
||
8 Fluidity test
8.1 Preparation of test materials
8.1.1 Accurately weigh the test material from the evenly mixed laboratory sample sufficient for two flow value measurements and put it into the mixing bucket.
8.1.2Use a measuring cylinder to measure stirring water, and the water temperature should be close to room temperature, accurate to 1ml. For the first time, according to the equivalent amount of water added to similar products, the water consumption is increased or decreased when measured again, and the amount of each increase or decrease is not greater than 0.5% of the dry weight of the test material. Weighing method for other liquid bonds.
8.1.3 Dry mix the test material at a slow speed for 1 min, and then stir it quickly, adding water or other liquid binder while stirring, stopping a little after 2 min, cleaning the mud material adhering to the mixing blade and the wall of the bucket, stirring it again for 2 min, and the total mixing time is 5 min.
8.2 Measurement of flow value
8.2.1 Place the conical mold on the shaking table, first add test material to 2/3 of the depth of the conical mold, pound with a rammer, then continue to add the remaining material, and pound flat.
8.2.2 Remove the conical mold, start the shaking table, and vibrate for 15 s.
8.2.3 Measure the values of the four diameters of the test material with a vernier caliper at an interval of 45°, and take their average values accurate to 1 mm. 8.2.4 Repeat the measurement twice according to steps 8.2.1~8.2.3, take the average value of the two times as the flow value result, and record the water consumption and flow value of the test material. The material that has been vibrated shall not be used for each measurement, and the preparation of the sample material and the two measurements shall be completed within 10 minutes. 8.2.5 The self-flowing castable is not rammed when feeding, and no vibration is required after filling. The conical mold is removed and left for 1 min. The flow value is measured according to 8.2.3~8.2.4.
8.3 Determination of the amount of water (or other liquid binder) added
When the flow value reaches 60%~90%, it is the appropriate water consumption, and it is used as the water consumption when the sample is formed.
9 Specimen Forming
9.1 From the evenly mixed test material, weigh the amount required for forming the sample and add the amount of water (or other liquid binder) determined in 8.3.
9.2 Prepare test materials according to 8.1.3.
9.3 Fix the test mold on the vibration table, fill the test material to the upper edge of the test mold, start the vibration table, and fill the test material while vibrating. 9.4 Stop the vibration, use a trowel to remove the test material above the edge of the test mold, and smooth the surface of the sample. For dense castables, the total vibration time is generally 60 s~90 s; For heat insulation castable, the whole vibration time is generally 30 ~60s. The whole time from the beginning of adding water to the sample molding should not exceed 10 minutes.
9.5 For the forming of the self-flowing castable sample, the evenly stirred test material shall be directly filled into the test mold and smoothed with a trowel after remaining for 2 min. 9.6 When the commissioning party provides the sample preparation and maintenance method, the method provided by the commissioning party shall be subject to the test report.
10.1 The gas-hardening refractory castable sample with mold is placed in the laboratory environment for curing for 24 hours and demoulded, and stored for another 24 hours under the same conditions. 10.2 The hydraulic refractory castable sample with mold is placed in a curing box with relative humidity of not less than 90% and temperature of 20℃ to 1℃. After curing for 24 hours, the mold is removed, and then cured for 24 hours under the same conditions.
10.3 The hot-set refractory castable sample with mold is placed in the oven at 40℃~110℃ for 12 h, and then dried under the same conditions for 24 h after demudding.
11 Sample drying
For the sample that needs to determine the rate of linear change, the size is measured immediately after stripping after curing. Then it is gradually heated in the oven to 110°C±5°C and dried at 110°C±5°C or under specified conditions for 24 h.
After drying, the sample is cooled to room temperature in the oven. After cooling, the sample should be stored in the dryer and the storage time should not exceed 3 days.
12 Test report
The test report shall include the following:
a) the entrusting unit;
b) sample name;
c) Laboratory temperature and relative humidity; Binding dose and flow value for test;
d) vibration time and stirring time;
e) curing conditions; Test unit;
f) test personnel;
g) Trial date.
